
SharePoint Online
Once you have installed the CardioLog Analytics SaaS add-in for SharePoint from the Microsoft Office Store, you will then be directed to a configuration screen.
The configuration contains a few simple steps that walk you through setting up data collection and connecting to Power BI reports.

CardioLog SaaS Configuration Screen
Step 1: Choose Sites To Track
In this step you can select which site collections you would like to see data for. Sites are only tracked once the tracking code is deployed for them in step 3.
- With this section expanded, you should see all of your available SharePoint Online site collections.
- Select all the sites you would like to begin monitoring using CardioLog.
- You can also search for site collections by typing in their name in the search bar.
- Select the button next to each site you would like to monitor.
- Click Save to confirm your selection.
You can go back and add more sites or remove sites from your selection at any point.
Please note that the import process for large site collections may take a few hours up to a few weeks, depending on the environment size.

CardioLog SaaS Configuration Screen: Step 1
Step 2: Choose User Properties To Report On
Using the search bar, enter the name of any property you would like to find and include.
Select the button next to each user property you would like to include in your usage reports.
Click Save to confirm your selection.
Properties may be added or removed at any time to accommodate your needs.

CardioLog SaaS Configuration Screen: Step 2
Step 3: Add The CardioLog Tracking Code To Your Sites
This step allows you to add the JavaScript tracking code to each of your sites.
You can add the tracking code to specific sites or deploy it on all selected site collections automatically.

CardioLog SaaS Configuration Screen: Step 3
Deploying the Tracking Code to all Selected Site Collections Automatically
- Download the automatic deployment Package from Step 3 in the Configuration page.
The package includes a PowerShell script that deploys the tracking agent wsp solution, modern sites integration app and the Java Script tracking code on all selected site collections. - Right click the downloaded package zip file, select Properties > General and click on "Unblock" before unzipping it.
- Execute the Run_Script.ps1 script in PowerShell (you must have the MS Online module installed and the credentials of the SharePoint Online global administrator).
Add the Tracking Code to a Site Collection Manually
- Browse to your SharePoint Online site Solution Gallery. The gallery should be found at this address by replacing the website root URL with yours: <https://company.sharepoint.com]/_catalogs/solutions/forms/allitems.aspx>
- From your Solution Gallery, click Upload Solution > Choose File. Then select CardioLog Analytics Integration.wsp and click Activate.
- If you are presented with a request for access, go to the Admin Center, found under the Office 365 Admin menu.
- From the SharePoint Admin Center select Settings.
- Choose Custom Script.
- Select Allow for both options. (Allow users to run custom script on personal sites & Allow users to run custom script on self-service created sites)
- The preference change may take up to 24 hours.
- In order to force the change to take place immediately, you may download and run the SharePoint Management Shell.
- Follow Microsoft's instructions for connecting it to your SharePoint Online tenant,
- Run the following shell command:
Set-SPOsite <SiteURL> -DenyAddAndCustomizePages 0
Once the solution is installed, return to the CardioLog Analytics configuration screen and copy the JavaScript tracking code.
Browse to CardioLog Analytics Integration solution configuration page. The page should be found at this address by replacing the website root URL with yours: <https://company.sharepoint.com]/CardioLogAnalytics/Configuration.2.0.8.0.aspx>
Paste the tracking code copied from Step 3 and click OK.
To enable support for tracking SharePoint Online modern sites and pages, install the Tracking Agent App:
Download the automatic deployment package from step 3 in the configuration page.
Upload CardioLogTrackingAgentAddin.sppkg app to the SharePoint Admin apps > App Catalog > Apps for SharePoint > New:
Click Deploy (do NOT select "Make this Solution available to all sites in the organization")
Go to the tracked Site Collection > Site Contents > New App
Click on Apps from your organization and click CardioLog Tracking Agent (it will be installed automatically)
Note: The tracking code contains links to the Events Listener web application in Azure.
Step 4: Connect to Power BI
In this step, you can connect to Power BI to gain access to your CardioLog Analytics reports.
Click Connect to Power BI and enter the Username and Password of a Power BI Pro user and click Save. This user will be the owner of the CardioLog Analytics SaaS app workspace in Power BI and will be able to share it with others in the organization.

CardioLog SaaS Configuration Screen: Step 4
Go to the Power BI interface.
Login with the credentials you entered in Step 1.
Create a Power BI app workspace for the CardioLog Analytics reports. Learn more about Power BI app workspaces.
Select Workspaces > Create app workspace
Enter the following details:
Name - CardioLog Analytics
Privacy - Private - Only approved members can see what's inside
Permissions - Members can edit Power BI contentAdd email addresses of people you want to have access to the workspace, and select Add. Note that you can't add group aliases, just individuals.
Decide whether each person is a member or an admin (admins can edit the workspace itself, including adding other members, members can edit the content in the workspace) and click Save.
CardioLog Analytics reports will be available in your app workspace within a few business days. You will receive an email notification as soon as all the data has been processed and your reports are ready to use.
- When the reports are ready, share them with your colleagues:
- Sign in to Power BI with the credentials you entered in Step 1.
- Select Worksaces > CardioLog Analytics > select the Publish app button in the upper right to start the process of sharing all the content in that workspace.
- First, on Details, enter the following details:
Description - Analytics for SharePoint and Yammer
Background color - Gray - Next, on Content, you see the content that's going to be published as part of the app. Select Specific content in the App landing page.
- Last, on Access, decide who has access to the app: either everyone in your organization, or specific people or email distribution lists and click Finish.
Step 5: Connect to Active Directory
In this step you can connect to your Azure Active Directory in order to import the number of active users in your organization.
- Login to SharePoint with the credentials of a global admin account that has permissions to sign in to Azure AD and read directory data (users' full profiles and groups).
- Click Connect to Active Directory to connect to your Azure Active Directory with the current logged on user and click Save.

SharePoint On-Premise
Browse to the configuration page hosted in Azure (URL provided by Intlock).
The configuration contains a few simple steps that walk you through setting up data collection and connecting to Power BI reports.

CardioLog SaaS Configuration Screen
Step 1: Connect to SharePoint
- Enter the SharePoint farm administrator user name and password and the SharePoint farm Admin Center URL and click Save.

CardioLog SaaS Configuration Screen: Step 1
Step 2: Choose Sites To Track
In this step you can select which site collections you would like to see data for. Site collections are only tracked once they are selected and the tracking code is deployed for them in step 4.
- With this section expanded, you should see all of your available SharePoint web applications.
- Expand each web application to select all the site collections you would like to begin monitoring using CardioLog.
- You can also search for site collections by typing in their name in the search bar.
- Select the button next to each site collection you would like to monitor.
- Click Save to confirm your selection.
You can go back and add more sites or remove sites from your selection at any point.
Please note that the import process for large site collections may take a few hours up to a few days, depending on the environment size.

CardioLog SaaS Configuration Screen: Step 2
Step 3: Choose User Properties To Report On
Using the search bar, enter the name of any property you would like to find and include.
Select the button next to each user property you would like to include in your usage reports.
Click Save to confirm your selection.
Properties may be added or removed at any time to accommodate your needs.

CardioLog SaaS Configuration Screen: Step 3
Step 4: Add The Tracking Code To Your Sites
This step allows you to add the JavaScript tracking code to each of your sites.
You can add the tracking code to specific sites or deploy it on all selected site collections automatically.

CardioLog SaaS Configuration Screen: Step 4
Deploying the Tracking Code to all Selected Site Collections Automatically
- Download the automatic deployment Package from Step 4 in the Configuration page.
The package includes a PowerShell script that deploys the tracking agent wsp solution, modern sites integration app and the Java Script tracking code on all selected site collections. - Right click the downloaded package zip file, select Properties > General and click on "Unblock" before unzipping it.
Execute the Run_Script.ps1 script in PowerShell on the SharePoint central admin server.
Note: SharePoint farm administrator and a local administrator on the SharePoint central admin server and WFEs is required. If deploying the tracking code on modern sites in SharePoint 2019, the user account must be a member of the sites Owners group and Full Control permissions on the App Catalog.
Add the Tracking Code to a Site Collection Manually
- Create a CardioLogAgent folder on all SharePoint WFE servers in the following location: C:\Program Files\Common Files\Microsoft Shared\web server extensions\14\TEMPLATE\LAYOUTS\CardioLogAgent (do not convert it to application in IIS).
- Create a CardioLogAgent.js file in the CardioLogAgent folder with the JavaScript tracking code. Copy the JavaScript tracking code from step 4.
- Copy the CardioLog Analytics Tracking solution file "cardiologtrackingagentfeature.wsp" to your SharePoint application server to C:\Program Files\Common Files\Microsoft Shared\web server extensions\1X\BIN folder (1X - 15 for SharePoint 2013, 16 for SharePoint 2016 and SharePoint 2019)
Execute the following commands from command prompt in order to add and deploy the solution to the SharePoint farm:
cd C:\Program Files\Common Files\Microsoft Shared\Web Server Extensions\1X\BIN
stsadm.exe -o addsolution -filename "C:\Program Files\Common Files\Microsoft Shared\Web Server Extensions\1X\BIN\CardioLogTrackingAgentFeature.wsp"
stsadm.exe -o deploysolution -name CardioLogTrackingAgentFeature.wsp -immediate -allowgacdeployment
stsadm.exe -o activatefeature -name CardioLogAnalytics -force
Step 5: Connect to Power BI
In this step, you can connect to Power BI to gain access to your CardioLog Analytics reports.
Click Connect to Power BI and enter the Username and Password of a Power BI Pro user and click Save. This user will be the owner of the CardioLog Analytics SaaS app workspace in Power BI and will be able to share it with others in the organization.

CardioLog SaaS Configuration Screen: Step 5Go to the Power BI interface.
Login with the credentials you entered in Step 1.
Create a Power BI app workspace for the CardioLog Analytics reports. Learn more about Power BI app workspaces.
Select Workspaces > Create app workspace
Enter the following details:
Name - CardioLog Analytics
Privacy - Private - Only approved members can see what's inside
Permissions - Members can edit Power BI contentAdd email addresses of people you want to have access to the workspace, and select Add. Note that you can't add group aliases, just individuals.
Decide whether each person is a member or an admin (admins can edit the workspace itself, including adding other members, members can edit the content in the workspace) and click Save.
CardioLog Analytics reports will be available in your app workspace within a few business days. You will receive an email notification as soon as all the data has been processed and your reports are ready to use.
- When the reports are ready, share them with your colleagues:
- Sign in to Power BI with the credentials you entered in Step 1.
- Select Worksaces > CardioLog Analytics > select the Publish app button in the upper right to start the process of sharing all the content in that workspace.
- First, on Details, enter the following details:
Description - Analytics for SharePoint and Yammer
Background color - Gray - Next, on Content, you see the content that's going to be published as part of the app. Select Specific content in the App landing page.
- Last, on Access, decide who has access to the app: either everyone in your organization, or specific people or email distribution lists and click Finish.
Step 6: Connect to Active Directory
In this step you can connect to your Active Directory in order to import the number of active users in your organization.
Enter the credentials of an account that has read access to Active Directory and the Active Directory domain controller name (FQDN) and click Save.

CardioLog SaaS Configuration Screen: Step 6
Please note that port 389 (LDAP)/port 636 (SLDAP) and the AD domain controller IP and FQDN should be available.
Yammer
Step 1 : Register a New Yammer App
- Go to the Created Apps page: https://www.yammer.com/client_applications
- Click Register New App For more information see "Yammer App Registration"

- Fill out the following fields within the submission form:
- Application Name - A unique name in Yammer, i.e. CardioLogAnalytics-companyname
- Organization - The name of your organization
- Support e-mail - An email address which users of your app can contact for support
- Website - Your organization's website
- Redirect URI - A URL to redirect the user's browser to, after the user has linked the application to their Yammer account, i.e. https://www.yammer.com/client_applications
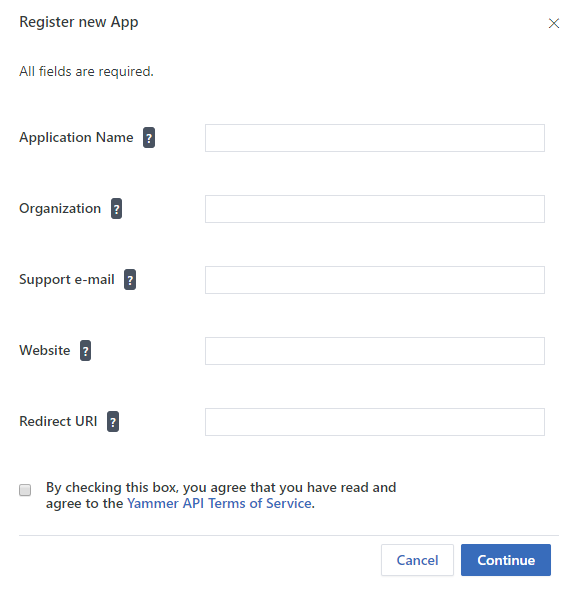
- Save changes to finish registering the app.
Step 2: Generate Keys and Tokens
- Click on the CardioLogAnalytics app to display its Basic Info.
- Click on "Generate a developer token for this application".

Save the Client ID, Client secret and token details from the Application Information page.
Step 3: Connect to Yammer
- Browse to the configuration page hosted in Azure (URL provided by Intlock).
- Connect to your Yammer network with a dedicated service account that is a Verified Admin in your Yammer network.

Step 4: Connect to Power BI
In this step, you can connect to Power BI to gain access to your CardioLog Analytics reports.
Click Connect to Power BI and enter the Username and Password of a Power BI Pro user and click Save. This user will be the owner of the CardioLog Analytics SaaS app workspace in Power BI and will be able to share it with others in the organization.

Go to the Power BI interface.
Login with the credentials you entered in Step 1.
Create a Power BI app workspace for the CardioLog Analytics reports. Learn more about Power BI app workspaces.
Select Workspaces > Create app workspace
Enter the following details:
Name - CardioLog Analytics
Privacy - Private - Only approved members can see what's inside
Permissions - Members can edit Power BI contentAdd email addresses of people you want to have access to the workspace, and select Add. Note that you can't add group aliases, just individuals.
Decide whether each person is a member or an admin (admins can edit the workspace itself, including adding other members, members can edit the content in the workspace) and click Save.
CardioLog Analytics reports will be available in your app workspace within a few business days. You will receive an email notification as soon as all the data has been processed and your reports are ready to use.
- When the reports are ready, share them with your colleagues:
- Sign in to Power BI with the credentials you entered in Step 1.
- Select Worksaces > CardioLog Analytics > select the Publish app button in the upper right to start the process of sharing all the content in that workspace.
- First, on Details, enter the following details:
Description - Analytics for SharePoint and Yammer
Background color - Gray - Next, on Content, you see the content that's going to be published as part of the app. Select Specific content in the App landing page.
- Last, on Access, decide who has access to the app: either everyone in your organization, or specific people or email distribution lists and click Finish.
Microsoft Teams
Once you have installed the CardioLog Analytics SaaS add-in from the Microsoft Office Store, you will then be directed to a configuration screen.
The configuration contains a few simple steps that walk you through setting up data collection and connecting to Power BI reports.

CardioLog SaaS Configuration Screen
Step 1: Connect to Power BI
In this step, you can connect to Power BI to gain access to your CardioLog Analytics reports.
Click Connect to Power BI and enter the Username and Password of a Power BI Pro user and click Save. This user will be the owner of the CardioLog Analytics SaaS app workspace in Power BI and will be able to share it with others in the organization.
Go to the Power BI interface.
Login with the credentials you entered in Step 1.
Create a Power BI app workspace for the CardioLog Analytics reports. Learn more about Power BI app workspaces.
Select Workspaces > Create app workspace
Enter the following details:
Name - CardioLog Analytics
Privacy - Private - Only approved members can see what's inside
Permissions - Members can edit Power BI contentAdd email addresses of people you want to have access to the workspace, and select Add. Note that you can't add group aliases, just individuals.
Decide whether each person is a member or an admin (admins can edit the workspace itself, including adding other members, members can edit the content in the workspace) and click Save.
CardioLog Analytics reports will be available in your app workspace within a few business days. You will receive an email notification as soon as all the data has been processed and your reports are ready to use.
- When the reports are ready, share them with your colleagues:
- Sign in to Power BI with the credentials you entered in Step 1.
- Select Worksaces > CardioLog Analytics > select the Publish app button in the upper right to start the process of sharing all the content in that workspace.
- First, on Details, enter the following details:
Description - Analytics for SharePoint and Yammer
Background color - Gray - Next, on Content, you see the content that's going to be published as part of the app. Select Specific content in the App landing page.
- Last, on Access, decide who has access to the app: either everyone in your organization, or specific people or email distribution lists and click Finish.
Step 2: Connect to Teams
Connect to Teams with a dedicated service account that is a global administrator in your Office 365 tenant. This account will be added as a member to selected Teams in order to track them.

Step 3: Choose Teams To Track
In this step you can select which Teams you would like to see data for.
- With this section expanded, you should see all of your available Teams.
- Select all the Teams you would like to begin monitoring using CardioLog.
- You can also search for Teams by typing in their name in the search bar.
- Select the button next to each Team you would like to monitor.
- Click Save to confirm your selection.
You can go back and add more Teams or remove Teams from your selection at any point.
Please note that the import process for large Teams may take a few hours up to a few days, depending on the environment size.
